
Hey everyone!
I am SO sorry for the lack of posts recently. Our internet was cut off a few times in the past week, and I've been too busy to post! My Junior Cert Mocks start next Thursday so I've been trying to hit the books, rather than the computer.
As a self-confessed makeup junkie, vintage lover, and perhaps a bit of a European history nerd, the idea of the first ever sellable created makeup fascinates me. Makeup is a huge part of female society today, and many people take it for granted. Makeup ranges from cheap to expensive, and there are so many brands out there to indulge in - Mac, Chanel, Max Factor, Rimmel, Benefit.. the list goes on! Makeup would definitely be included in my 'these are a few of my favorite things' songs [I love the Sound of Music a bit too much too!]. It can completely change your look, define your features, make you feel confident. I don't think I could ever leave the house without a dab of concealer or a slick of eyeliner. But WHERE did it all come from?
Mascara
Although mascara was originally worn by the likes of Cleopatra from charcoal, soot, honey and crocodile stool [ew!], mascara didn't evolve and become available to women throughout the world until the nineteenth century. A chemist named Eugene Rimmel developed the cosmetic using vaseline, but it was T.L Williams that started selling in. It was made from a mixture of charcoal and vaseline too, and WIlliams names it after his sister Maybel and vaseline.. Which led to name and the brand we love today, Maybelline! A dampened brush was wet against the 'cake' which also included black dye and soap. It was extremely messy and developments didn't yet occur until Elizabeth Arden came along after World War 1.

the mascara in its packaging - how I'd love to get my hands on one of them!

promotional posters created by Maybelline
__________________
Blusher
The first power blush came around in 1863, created by actor Joseph-Albert Ponsin. The company later became.. Bourjois! yes those 'little round pots' we've come to know and love today were once a grand spectacle back in the late 1800's. To achieve the silky powdered texture, power, water and mother-of-pearl were mixed together and baked to create the soft blush.


the very first little round pot!

vintage Bourjois promotional posters [couldn't find one exactly for the blush]
______________
So there you have it! A little bit of makeup history for you readers :)
- Rachel x
Makeup - Where did it all begin?
1.23.2013
Hey everyone!
I am SO sorry for the lack of posts recently. Our internet was cut off a few times in the past week, and I've been too busy to post! My Junior Cert Mocks start next Thursday so I've been trying to hit the books, rather than the computer.
As a self-confessed makeup junkie, vintage lover, and perhaps a bit of a European history nerd, the idea of the first ever sellable created makeup fascinates me. Makeup is a huge part of female society today, and many people take it for granted. Makeup ranges from cheap to expensive, and there are so many brands out there to indulge in - Mac, Chanel, Max Factor, Rimmel, Benefit.. the list goes on! Makeup would definitely be included in my 'these are a few of my favorite things' songs [I love the Sound of Music a bit too much too!]. It can completely change your look, define your features, make you feel confident. I don't think I could ever leave the house without a dab of concealer or a slick of eyeliner. But WHERE did it all come from?
Mascara
Although mascara was originally worn by the likes of Cleopatra from charcoal, soot, honey and crocodile stool [ew!], mascara didn't evolve and become available to women throughout the world until the nineteenth century. A chemist named Eugene Rimmel developed the cosmetic using vaseline, but it was T.L Williams that started selling in. It was made from a mixture of charcoal and vaseline too, and WIlliams names it after his sister Maybel and vaseline.. Which led to name and the brand we love today, Maybelline! A dampened brush was wet against the 'cake' which also included black dye and soap. It was extremely messy and developments didn't yet occur until Elizabeth Arden came along after World War 1.
the mascara in its packaging - how I'd love to get my hands on one of them!
promotional posters created by Maybelline
__________________
Blusher
The first power blush came around in 1863, created by actor Joseph-Albert Ponsin. The company later became.. Bourjois! yes those 'little round pots' we've come to know and love today were once a grand spectacle back in the late 1800's. To achieve the silky powdered texture, power, water and mother-of-pearl were mixed together and baked to create the soft blush.
the very first little round pot!
vintage Bourjois promotional posters [couldn't find one exactly for the blush]
______________
So there you have it! A little bit of makeup history for you readers :)
- Rachel x
Morning everyone!
I bought this concealer a while ago and actually forgot to write a review. Well, here I am now! I have a mixed opinion on this concealer to be honest.
The packaging is simple and plain, and I dislike that the writing and information is in grey, as it's bound to fade after a while, and there's nothing worse than grubby-but-not-old looking products.

Consistency wise, it's really soft and creamy, which is what I definitely look for in a good concealer. It's easy to blend and it's also quite pale, which I really like seeing as I'm so pale myself. It's a bit like a highlighter when applied under the eyes- which is particularly helpful on those early school mornings!

HOWEVER it does say it last for '16 hours'. WRONG. I don't think it even lasts 4 hours let alone 16! It seems to disappear into the skin, seeing as it is really pale and thin. I was not impressed. I had to do a touch up twice in a school day because it kept rubbing off. At €3, it's not bad for the price it is but I don't think I'll be buying it again.
Rating; 2/5
-Rachel x
Essence Concealer | Review |
1.16.2013
Morning everyone!
I bought this concealer a while ago and actually forgot to write a review. Well, here I am now! I have a mixed opinion on this concealer to be honest.
The packaging is simple and plain, and I dislike that the writing and information is in grey, as it's bound to fade after a while, and there's nothing worse than grubby-but-not-old looking products.
Consistency wise, it's really soft and creamy, which is what I definitely look for in a good concealer. It's easy to blend and it's also quite pale, which I really like seeing as I'm so pale myself. It's a bit like a highlighter when applied under the eyes- which is particularly helpful on those early school mornings!
HOWEVER it does say it last for '16 hours'. WRONG. I don't think it even lasts 4 hours let alone 16! It seems to disappear into the skin, seeing as it is really pale and thin. I was not impressed. I had to do a touch up twice in a school day because it kept rubbing off. At €3, it's not bad for the price it is but I don't think I'll be buying it again.
Rating; 2/5
-Rachel x
Hello everyone!
With Valentines Day soon approaching [one month peeps! might I mention it's also my birthday then...?] I thought I'd post a recipe to inspire you on a different type of gift this year. Why not home bake some cupcakes for your lover? Everyone loves cupcakes!
I baked these for my Christmas exam at school- the task was to create cupcakes and icing for a special occasion. I got the recipe from a cupcake book, 'Best Baking: Delicious Cupcakes (1) Made Easy'. To be quite honest, they're just chocolate cupcakes accompanied by vanilla icing, but that's what makes them so great. They're melt in the mouth, tasty AND easy to bake!

me looking ridiculously cheesy in a cupcake apron
Makes: 12 | Preparation: 30 mins [and cooling] | Cooking: 20 mins
Ingredients:
Cupcakes
125g soft butter
125g caster sugar
2 eggs
150g self-raising flour
75g cocoa powder
4 tbsp milk
Icing
125g soft butter
200g icing sugar
a drop of vanilla essence
red food colouring
Method:
- Preheat the oven to 180°C/ 350°F/ gas 4. Beat together the butter and caster sugar until its pale and fluffy. I used an electric whisk on a low/medium speed. Beat the eggs in one by one. You can add a small bit f flour to prevent curdling if you want, but I didn't bother and it turned out fine! Sift in the flour and cocoa together, so there's no lumps, and gently fold it all together. Mix in the milk, as much as you need, to make it moist.
- Place paper cases into muffin tins- you can use cupcake tins but I prefer muffin as it gives them a better shape. Divide the mixture between the cases, about a heap tablespoon full. Bake for about 20 minutes [give a little, I usually find 30 minutes is best] and leave to cool on a wire rack when done.
- For the buttercream icing: Beat together the butter and icing sugar with a small drop of red food colouring- so it is a pale pink- until you get a smooth but firm consistency. Use a piping bag [I used one that had a hole in the middle of the nozzle] to decorate the cupcakes with the icing. MAKE SURE YOU LEAVE SOME ICING IN THE BOWL! This is to make the middle part of the cupcake. Just add some more red food colouring to make it darker and pipe in the middle, so it looks like flowers. I also sprinkled pink edible glitter on them!

Bon appetit!
- Rachel x
St. Valentine's Cupcakes
1.14.2013
Hello everyone!
With Valentines Day soon approaching [one month peeps! might I mention it's also my birthday then...?] I thought I'd post a recipe to inspire you on a different type of gift this year. Why not home bake some cupcakes for your lover? Everyone loves cupcakes!
I baked these for my Christmas exam at school- the task was to create cupcakes and icing for a special occasion. I got the recipe from a cupcake book, 'Best Baking: Delicious Cupcakes (1) Made Easy'. To be quite honest, they're just chocolate cupcakes accompanied by vanilla icing, but that's what makes them so great. They're melt in the mouth, tasty AND easy to bake!
me looking ridiculously cheesy in a cupcake apron
Makes: 12 | Preparation: 30 mins [and cooling] | Cooking: 20 mins
Ingredients:
Cupcakes
125g soft butter
125g caster sugar
2 eggs
150g self-raising flour
75g cocoa powder
4 tbsp milk
Icing
125g soft butter
200g icing sugar
a drop of vanilla essence
red food colouring
Method:
- Preheat the oven to 180°C/ 350°F/ gas 4. Beat together the butter and caster sugar until its pale and fluffy. I used an electric whisk on a low/medium speed. Beat the eggs in one by one. You can add a small bit f flour to prevent curdling if you want, but I didn't bother and it turned out fine! Sift in the flour and cocoa together, so there's no lumps, and gently fold it all together. Mix in the milk, as much as you need, to make it moist.
- Place paper cases into muffin tins- you can use cupcake tins but I prefer muffin as it gives them a better shape. Divide the mixture between the cases, about a heap tablespoon full. Bake for about 20 minutes [give a little, I usually find 30 minutes is best] and leave to cool on a wire rack when done.
- For the buttercream icing: Beat together the butter and icing sugar with a small drop of red food colouring- so it is a pale pink- until you get a smooth but firm consistency. Use a piping bag [I used one that had a hole in the middle of the nozzle] to decorate the cupcakes with the icing. MAKE SURE YOU LEAVE SOME ICING IN THE BOWL! This is to make the middle part of the cupcake. Just add some more red food colouring to make it darker and pipe in the middle, so it looks like flowers. I also sprinkled pink edible glitter on them!
Bon appetit!
- Rachel x
Bonjour bloggers :)
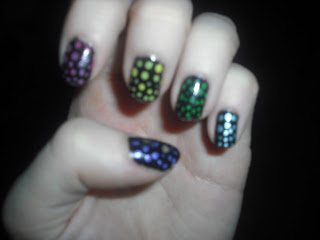
My nails idea of the week occurred to me at a spur of the moment. I was inspired by the neon lights in Las Vegas, the disco dancing in the 80's and the reoccurring neon trend that seems to pop up on fashion week every couple of years. What makes this nail art even better is that it is SO easy! I swear even my dad could try his hand at this.


My nails idea of the week occurred to me at a spur of the moment. I was inspired by the neon lights in Las Vegas, the disco dancing in the 80's and the reoccurring neon trend that seems to pop up on fashion week every couple of years. What makes this nail art even better is that it is SO easy! I swear even my dad could try his hand at this.
I used the following products:

[from l-r: Essence quick dry topcoat, Sally Hensen hard as nails, Bourjois so lacquer black, NYC green, NYC yellow, Avon pink, Colour Club purple & Collection 2000 ice blue, double sided dotting tool.
~
Steps:
- Paint your nails with two coats of base coat [I used Sally Hensen] and allow to dry. This prevents the polish from staining your nails and the one I have also strengthens your nails.
- Apply black nail varnish on all nails.
- Using a dotting tool, a toothpick or a small pin stuck onto an eraser-pencil, put different size dots on your nails.
- Apply a top coat for a long lasting, glossy finish.

without flash

with flash
Voila! Enjoy :)
Rachel x
'Disco Dotty' nails
1.13.2013
Bonjour bloggers :)
My nails idea of the week occurred to me at a spur of the moment. I was inspired by the neon lights in Las Vegas, the disco dancing in the 80's and the reoccurring neon trend that seems to pop up on fashion week every couple of years. What makes this nail art even better is that it is SO easy! I swear even my dad could try his hand at this.
My nails idea of the week occurred to me at a spur of the moment. I was inspired by the neon lights in Las Vegas, the disco dancing in the 80's and the reoccurring neon trend that seems to pop up on fashion week every couple of years. What makes this nail art even better is that it is SO easy! I swear even my dad could try his hand at this.
I used the following products:
[from l-r: Essence quick dry topcoat, Sally Hensen hard as nails, Bourjois so lacquer black, NYC green, NYC yellow, Avon pink, Colour Club purple & Collection 2000 ice blue, double sided dotting tool.
~
Steps:
- Paint your nails with two coats of base coat [I used Sally Hensen] and allow to dry. This prevents the polish from staining your nails and the one I have also strengthens your nails.
- Apply black nail varnish on all nails.
- Using a dotting tool, a toothpick or a small pin stuck onto an eraser-pencil, put different size dots on your nails.
- Apply a top coat for a long lasting, glossy finish.
without flash
with flash
Voila! Enjoy :)
Rachel x
Hey everyone :)
If you have been following my blog for a while now you might have read a post written by me about 2 months ago [if not you can find it here] explaining how I was chosen to be the Reader Style Crush in KISS magazine - Ireland's only teen magazine. I was literally so excited when I heard I would be in the February Issue [out now!] as my feature had been pushed back a month seeing as I was in the November Issue for the 'Your Space' page [about my bedroom].
Basically KISS feature a different girl each month, along with an interview and ideas on how to recreate the outfit. My outfit was titled 'Modern Vintage'. Below are some pictures for those who don't read the magazine- I would encourage you to do so if you don't, its brilliant!;


Have you ever been featured in a magazine?
-Rachel x
I'm in KISS magazine!
1.11.2013
Hey everyone :)
If you have been following my blog for a while now you might have read a post written by me about 2 months ago [if not you can find it here] explaining how I was chosen to be the Reader Style Crush in KISS magazine - Ireland's only teen magazine. I was literally so excited when I heard I would be in the February Issue [out now!] as my feature had been pushed back a month seeing as I was in the November Issue for the 'Your Space' page [about my bedroom].
Basically KISS feature a different girl each month, along with an interview and ideas on how to recreate the outfit. My outfit was titled 'Modern Vintage'. Below are some pictures for those who don't read the magazine- I would encourage you to do so if you don't, its brilliant!;
Have you ever been featured in a magazine?
-Rachel x
almost entirely Penneys/Primark. What I love about this outfit is that it looks so chic and expensive - but really, it wasn't!
My Dr. Martens are my new babies by the way (ok I own up, they're actually fake..). They're so comfortable, and lined with faux sheepskin inside which really adds to the wearability factor. I bought them at a street market, believe it or not.
The blouse has a waterfall effect, so it's long at the back and just above thigh let at the front. Its really light and see through at the back, so I wore a black tank top underneath. The best part? It was €5 on sale! (Penneys best!) I was so proud with this bargain as it can be worn in numerous different ways.
The leather panelled leggings are AGAIN from my favorite bargain hunting shop, and I paid around €10 for these. I picked these up when having a snoop around in the sales (which weren't even that good this year apart from these purchases).
I was actually going ice-skating the day I wore this outfit so I threw on a black chunky knitted cardigan and a purple leather jacket, customised by moi with some silver studs I snapped up on eBay.
And I am VERY happy to say I did not fall over once.. ;)
- Rachel
OOTD - Today I'm wearing..
1.09.2013
almost entirely Penneys/Primark. What I love about this outfit is that it looks so chic and expensive - but really, it wasn't!
My Dr. Martens are my new babies by the way (ok I own up, they're actually fake..). They're so comfortable, and lined with faux sheepskin inside which really adds to the wearability factor. I bought them at a street market, believe it or not.
The blouse has a waterfall effect, so it's long at the back and just above thigh let at the front. Its really light and see through at the back, so I wore a black tank top underneath. The best part? It was €5 on sale! (Penneys best!) I was so proud with this bargain as it can be worn in numerous different ways.
The leather panelled leggings are AGAIN from my favorite bargain hunting shop, and I paid around €10 for these. I picked these up when having a snoop around in the sales (which weren't even that good this year apart from these purchases).
I was actually going ice-skating the day I wore this outfit so I threw on a black chunky knitted cardigan and a purple leather jacket, customised by moi with some silver studs I snapped up on eBay.
And I am VERY happy to say I did not fall over once.. ;)
- Rachel
As a young makeup junkie I love trying out the latest in beauty and makeup, but for a reasonable price. One of my favorite items of makeup has got to be lipstick. My style is quite retro vintage [gangster Nancy Sinatra as Lana Del Rey would say] and I believe lipstick can really make one of the biggest changes to your look [eyeliner comes a close second]. From matte to satin, stick to gloss, sheer to heavy, there are PLENTY of lipsticks on the market to choose from.


[left to right in order of appearance below]
My favorite lipsticks [of 2012] are;
1. Rimmel London Matte Lasting Finish by Kate Moss: I have seen sooo many reviews for this collection and it just shows how popular they are! For only €6 or something it really it my favorite lipstick. I have shade 107 which is a deep berry tone [you can see me wearing it in alot of my outfit of the days]. I literally wear it all the time, but not going to school :p Its matte and lasts through out the day without any signs of wearing. It also doesn't dry up your lips either, which is always a good thing! Definitely 5/5 for me.
2. Rimmel London Lasting Finish by Kate Moss: No, this is not the same as the lipstick above. This is the older collection, which I don't think consists entirely of matte lipsticks. I own shade 20, a bright magenta pink. This too really does have a lasting finish and even pasts the having-a-drink test without smudging or fading! It doesn't look as matte as the one above and looks quite wet. Yet again, a very bright lipstick that I don't wear to school :p
3. 17 Lasting Fix Lipstick: Why is it that all these lipstick collections have the word lasting in them? ANYWAYS I only recently bought this lipstick over Christmas, however I am in love already. It is satin but not sheer, and leaves your lips nice and moisturised. I bought the shade 'poncho pink' which is a bright baby pink.
4. Essence [shade 03, sparkling angel]: I like Essence lipsticks honestly for the fact that they are only about €3. This shade is a mixture between a copper and red, with flecks of gold running through it. Although it doesn;t have that 'lasting finish' like the others, it's perfect for a more natural look [i.e school].
5. Essence [shade 42, fairytale]: This is basically the same as the one above, but it doesn't have glitter, and when applied its a soft rusty pink. I wear this when I do my eyeliner quite bold because it is so natural.

[from left to right] Rimmel shade 107, Rimmel shade 20, Essence 03, Essence 42, 17 poncho pink

[same order as above]
- Rachel x
Top 5 lipsticks [of 2012 anyways!]
1.07.2013
As a young makeup junkie I love trying out the latest in beauty and makeup, but for a reasonable price. One of my favorite items of makeup has got to be lipstick. My style is quite retro vintage [gangster Nancy Sinatra as Lana Del Rey would say] and I believe lipstick can really make one of the biggest changes to your look [eyeliner comes a close second]. From matte to satin, stick to gloss, sheer to heavy, there are PLENTY of lipsticks on the market to choose from.
[left to right in order of appearance below]
My favorite lipsticks [of 2012] are;
1. Rimmel London Matte Lasting Finish by Kate Moss: I have seen sooo many reviews for this collection and it just shows how popular they are! For only €6 or something it really it my favorite lipstick. I have shade 107 which is a deep berry tone [you can see me wearing it in alot of my outfit of the days]. I literally wear it all the time, but not going to school :p Its matte and lasts through out the day without any signs of wearing. It also doesn't dry up your lips either, which is always a good thing! Definitely 5/5 for me.
2. Rimmel London Lasting Finish by Kate Moss: No, this is not the same as the lipstick above. This is the older collection, which I don't think consists entirely of matte lipsticks. I own shade 20, a bright magenta pink. This too really does have a lasting finish and even pasts the having-a-drink test without smudging or fading! It doesn't look as matte as the one above and looks quite wet. Yet again, a very bright lipstick that I don't wear to school :p
3. 17 Lasting Fix Lipstick: Why is it that all these lipstick collections have the word lasting in them? ANYWAYS I only recently bought this lipstick over Christmas, however I am in love already. It is satin but not sheer, and leaves your lips nice and moisturised. I bought the shade 'poncho pink' which is a bright baby pink.
4. Essence [shade 03, sparkling angel]: I like Essence lipsticks honestly for the fact that they are only about €3. This shade is a mixture between a copper and red, with flecks of gold running through it. Although it doesn;t have that 'lasting finish' like the others, it's perfect for a more natural look [i.e school].
5. Essence [shade 42, fairytale]: This is basically the same as the one above, but it doesn't have glitter, and when applied its a soft rusty pink. I wear this when I do my eyeliner quite bold because it is so natural.
[from left to right] Rimmel shade 107, Rimmel shade 20, Essence 03, Essence 42, 17 poncho pink
[same order as above]
- Rachel x
Have I even said Happy New Years yet?! Well Happy New Years everyone! Lets hope 2013 is a good one. I read a post on Leanne Woodfull's blog, (http://thunderandthreads.blogspot.ie) and got inspired to write this post. My blogging resolutions for 2013 are;
1. Strip back my blog- I've decided naybe it looks a bit too fussy, and unoriginal. There are plenty of people using this design probably and I want my blog to look a bit more unique.
2. Post more often!- I've realised my lack of posting has just come down to sheer laziness. I have my Junior Cert this year so blogging should help me take my mind off things (without getting distracted of course).
3. Create a variety of different posts- (without my blog getting messy). All I seem to post are my nails and outfits of the day. I'm going to start posting recipes (I make alot of cupcakes ok), beauty and skincare reviews, and basically whatever comes to mind!
4. Start using a camera, rather than my ipod- I don't even HAVE my own camera but we have a silver digital camera for the whole family (not that we use it much but anyways, it will get its uses now!) so I think it would be best to try that out instead.
What are your blogging resolutions, if you have any? I don't even know if anyone reads my blog- please tell me if you are? Are all my thoughts and opinion posting realy just a waste of my not-so-valuable time?
- Rachel x
My blogging New Years resolutions
1.06.2013
Have I even said Happy New Years yet?! Well Happy New Years everyone! Lets hope 2013 is a good one. I read a post on Leanne Woodfull's blog, (http://thunderandthreads.blogspot.ie) and got inspired to write this post. My blogging resolutions for 2013 are;
1. Strip back my blog- I've decided naybe it looks a bit too fussy, and unoriginal. There are plenty of people using this design probably and I want my blog to look a bit more unique.
2. Post more often!- I've realised my lack of posting has just come down to sheer laziness. I have my Junior Cert this year so blogging should help me take my mind off things (without getting distracted of course).
3. Create a variety of different posts- (without my blog getting messy). All I seem to post are my nails and outfits of the day. I'm going to start posting recipes (I make alot of cupcakes ok), beauty and skincare reviews, and basically whatever comes to mind!
4. Start using a camera, rather than my ipod- I don't even HAVE my own camera but we have a silver digital camera for the whole family (not that we use it much but anyways, it will get its uses now!) so I think it would be best to try that out instead.
What are your blogging resolutions, if you have any? I don't even know if anyone reads my blog- please tell me if you are? Are all my thoughts and opinion posting realy just a waste of my not-so-valuable time?
- Rachel x
1. Strip back my blog- I've decided naybe it looks a bit too fussy, and unoriginal. There are plenty of people using this design probably and I want my blog to look a bit more unique.
2. Post more often!- I've realised my lack of posting has just come down to sheer laziness. I have my Junior Cert this year so blogging should help me take my mind off things (without getting distracted of course).
3. Create a variety of different posts- (without my blog getting messy). All I seem to post are my nails and outfits of the day. I'm going to start posting recipes (I make alot of cupcakes ok), beauty and skincare reviews, and basically whatever comes to mind!
4. Start using a camera, rather than my ipod- I don't even HAVE my own camera but we have a silver digital camera for the whole family (not that we use it much but anyways, it will get its uses now!) so I think it would be best to try that out instead.
What are your blogging resolutions, if you have any? I don't even know if anyone reads my blog- please tell me if you are? Are all my thoughts and opinion posting realy just a waste of my not-so-valuable time?
- Rachel x
Well.. At least I THINK that's what they're called anyways! I got inspired from a book I got for Christmas, Lauren Conrad Beauty (which is really helpful with lots if neat tips and tricks by the way). I did something similar last year but thought I'd try it out again.
They're really simple to do too, but look pretty chic, which shows you don't need to have fanc tools or a nack for nail art to achieve this look! All I did was paint my nails (pink) and painted along the bottom of my nail (close to the cuticle) black, curving it at the top. Have fun trying it out yourself:)

They're really simple to do too, but look pretty chic, which shows you don't need to have fanc tools or a nack for nail art to achieve this look! All I did was paint my nails (pink) and painted along the bottom of my nail (close to the cuticle) black, curving it at the top. Have fun trying it out yourself:)
Half moon nails
Well.. At least I THINK that's what they're called anyways! I got inspired from a book I got for Christmas, Lauren Conrad Beauty (which is really helpful with lots if neat tips and tricks by the way). I did something similar last year but thought I'd try it out again.
They're really simple to do too, but look pretty chic, which shows you don't need to have fanc tools or a nack for nail art to achieve this look! All I did was paint my nails (pink) and painted along the bottom of my nail (close to the cuticle) black, curving it at the top. Have fun trying it out yourself:)
They're really simple to do too, but look pretty chic, which shows you don't need to have fanc tools or a nack for nail art to achieve this look! All I did was paint my nails (pink) and painted along the bottom of my nail (close to the cuticle) black, curving it at the top. Have fun trying it out yourself:)
Subscribe to:
Posts (Atom)


