
Hey everyone,
The duster coat- warm enough to protect against the harsh Irish winters, light enough to throw over any outfit, and practicably stylish. No longer just worn by the likes of Sherlock Holmes, but found upon celebrities like Kylie Jenner and fashion bloggers galore. Gone are the Autumn/Winters of the mac, or the duffle. A/W 2014 brings a rise in heating bills, hot chocolate sales, and the duster coat. First seen on the catwalks of Chanel this year, the duster coat is about to bring the Winter coat into a new era.
Lucky enough for us, they're currently every where on the high street. With so many colours and patterns to choose from, I personally can't decide which one I like best! I picked up a vintage Quin & Donnelly one a few months ago for a mere €3- I must have the power of trend forecasting engraved in my mind. If vintage isn't your thing, Topshop, New Look and River Island all have stylish offerings for very reasonable prices. Not only that, but a good coat will last you for years!
Not sure if you can pull it off? Think again! The trusty duster can be worn with simple jeans and a tee, or thrown over a mini skirt and heeled sandals. Choose a basic colour if you're looking for a staple item, or a brighter pattern if you're not afraid to stand out. Either way, the duster coat is most certainly my favourite trend this season, and I can't wait for those colder days to arrive so I can dig mine out!
Will you be rocking a duster coat this season?
Style Edit: The Duster Coat
8.30.2014
Hey everyone,
The duster coat- warm enough to protect against the harsh Irish winters, light enough to throw over any outfit, and practicably stylish. No longer just worn by the likes of Sherlock Holmes, but found upon celebrities like Kylie Jenner and fashion bloggers galore. Gone are the Autumn/Winters of the mac, or the duffle. A/W 2014 brings a rise in heating bills, hot chocolate sales, and the duster coat. First seen on the catwalks of Chanel this year, the duster coat is about to bring the Winter coat into a new era.
Lucky enough for us, they're currently every where on the high street. With so many colours and patterns to choose from, I personally can't decide which one I like best! I picked up a vintage Quin & Donnelly one a few months ago for a mere €3- I must have the power of trend forecasting engraved in my mind. If vintage isn't your thing, Topshop, New Look and River Island all have stylish offerings for very reasonable prices. Not only that, but a good coat will last you for years!
Not sure if you can pull it off? Think again! The trusty duster can be worn with simple jeans and a tee, or thrown over a mini skirt and heeled sandals. Choose a basic colour if you're looking for a staple item, or a brighter pattern if you're not afraid to stand out. Either way, the duster coat is most certainly my favourite trend this season, and I can't wait for those colder days to arrive so I can dig mine out!
Will you be rocking a duster coat this season?

Hey everyone,
I was recently sent a few products by Fuschia Makeup to try out,so today I'm going to tell you a little bit more about the brand, and also including some mini reviews! Fuschia are an Irish makeup brand, with two shops in Drogheda & Swords and stockists all over the country. My grandmother lives near Drogheda so whenever I go to visit Scotch Hall Shopping Centre I pass the store, but truth be told I've never bought anything! Over the past few days, I've read multiple reviews on Fuschia Makeup, both good and bad. After a bit of researching, it appears that some of their products are private labelled: meaning the products are made by a different company and sold under the Fuschia name. However, a lot of the products are their own! In all honesty, this didn't bother me too much, seeing as brands like Coastal Scents are similar. Anyways; on to the products!
The 'make your own eyeshadow palette*' was the first thing that caught my eye. For €40 you choose 5 eye shadows to fit into a pretty compact palette. I actually really like these eyeshadows, as I'm usually quite wary of matte shadows! These are reasonably pigmeted but definitely look better over a primer. I found them really buttery and easy to blend too! However, €40 for 5 shadows does seem overpriced in my opinion. I realise the likes of MAC are more expensive, but the Naked palettes by Urban Decay are in the €40's too- and you get 12 shadows.

That said, the 'classic matte lipstick*' in the shade 'vamp'was the product I really adored. It really has me down to a T! Not only am I a major fan of berry lipsticks, but I also love vampires & the supernatural, so it was really quite fitting. It was a bit drying as most matte lipsticks are, but a bit of lip balm underneath will sort you out. Price wise, its similar enough to Inglot at €13.50.
I received a sample size tube of their primer* which I knew wouldn't last me long- I barely got 3 applications out of it! It feels super velvety and I liked how it had a bit of shimmer through it for an illuminating finish. As for extending the wear time of my foundation, I didn't really notice much of a difference! €22 for the full product.

Lastly, I'll give a mention to the 'brow wax kit'* for €15.50. I sampled their best-selling shade 'taupe' which was unfortunately a bit too light for my brows! I've been using it on days when I want a more natural look though, as I was really impressed by the pigmentation. I found the brow wax bit difficult to apply, as the brush supplied with the kit was a tad cheap looking.

Overall, Fuschia Makeup have some really good quality products- but for a teenage student on a budget like me, they are a small bit overpriced. I think if their prices were lowered for their eye-shadows especially I'd definitely be purchasing for them! The packaging is really girly and sleek so thumbs up on that front from me too. You can buy Fuschia online here.
Have you ever tried Fuschia Makeup?
Brand Focus: Fuschia Makeup
8.27.2014
Hey everyone,
I was recently sent a few products by Fuschia Makeup to try out,so today I'm going to tell you a little bit more about the brand, and also including some mini reviews! Fuschia are an Irish makeup brand, with two shops in Drogheda & Swords and stockists all over the country. My grandmother lives near Drogheda so whenever I go to visit Scotch Hall Shopping Centre I pass the store, but truth be told I've never bought anything! Over the past few days, I've read multiple reviews on Fuschia Makeup, both good and bad. After a bit of researching, it appears that some of their products are private labelled: meaning the products are made by a different company and sold under the Fuschia name. However, a lot of the products are their own! In all honesty, this didn't bother me too much, seeing as brands like Coastal Scents are similar. Anyways; on to the products!
The 'make your own eyeshadow palette*' was the first thing that caught my eye. For €40 you choose 5 eye shadows to fit into a pretty compact palette. I actually really like these eyeshadows, as I'm usually quite wary of matte shadows! These are reasonably pigmeted but definitely look better over a primer. I found them really buttery and easy to blend too! However, €40 for 5 shadows does seem overpriced in my opinion. I realise the likes of MAC are more expensive, but the Naked palettes by Urban Decay are in the €40's too- and you get 12 shadows.
That said, the 'classic matte lipstick*' in the shade 'vamp'was the product I really adored. It really has me down to a T! Not only am I a major fan of berry lipsticks, but I also love vampires & the supernatural, so it was really quite fitting. It was a bit drying as most matte lipsticks are, but a bit of lip balm underneath will sort you out. Price wise, its similar enough to Inglot at €13.50.
I received a sample size tube of their primer* which I knew wouldn't last me long- I barely got 3 applications out of it! It feels super velvety and I liked how it had a bit of shimmer through it for an illuminating finish. As for extending the wear time of my foundation, I didn't really notice much of a difference! €22 for the full product.
Lastly, I'll give a mention to the 'brow wax kit'* for €15.50. I sampled their best-selling shade 'taupe' which was unfortunately a bit too light for my brows! I've been using it on days when I want a more natural look though, as I was really impressed by the pigmentation. I found the brow wax bit difficult to apply, as the brush supplied with the kit was a tad cheap looking.
Overall, Fuschia Makeup have some really good quality products- but for a teenage student on a budget like me, they are a small bit overpriced. I think if their prices were lowered for their eye-shadows especially I'd definitely be purchasing for them! The packaging is really girly and sleek so thumbs up on that front from me too. You can buy Fuschia online here.
Have you ever tried Fuschia Makeup?

images from polyvore
Hey everyone,
My 'unlikely style icon' post [read here] went down quite well here on my blog, and I got a lot of lovely comments on the collage- thank you! I've decided to create another style icon post, although this one isn't 'unlikely', but rather the style crush of many girls [and women] across the world- Kendall Jenner. I've also added a bonus twist, by picking pieces that Kendall would surely approve of for less than €25!
Kendall is certainly a fan of the monochrome look, and is often seen dressed in head to toe black and white with a pop of colour. She also wears a lot of basic, staple pieces, yet managing to look super glamorous! Her every day look is quite effortless and youthful, but on the red carpet she definitely likes to dress up. I've chosen a few pieces from across the highstreet that channel the Keeping Up With The Kardashian star's look, as not all of us can afford her high end bits!

l-r; New look jeans & clutch, Romwe sunglasses, Boohoo blazer & dress, iClothing shoes, Missguided crop top
Basic black skinnies are worn by Kendall frequently, and I think they would look great with a white crop top and floral blazer as shown above. You could also mix and match the pieces to dress them up or down! Kendall is quite the fan of cutout dresses, so this Boohoo option is perfect. She also seems quite fond of strappy sandals and jewelled clutches whilst on the red carpet! Better yet, but all these options are under the €25 mark. Score!
Are you a fan of Kendall Jenner's style? If you have a style icon whose look you would like me to recreate, let me know!
Kendall Jenner: Steal Her Style For Less Than €25!
8.25.2014
images from polyvore
Hey everyone,
My 'unlikely style icon' post [read here] went down quite well here on my blog, and I got a lot of lovely comments on the collage- thank you! I've decided to create another style icon post, although this one isn't 'unlikely', but rather the style crush of many girls [and women] across the world- Kendall Jenner. I've also added a bonus twist, by picking pieces that Kendall would surely approve of for less than €25!
Kendall is certainly a fan of the monochrome look, and is often seen dressed in head to toe black and white with a pop of colour. She also wears a lot of basic, staple pieces, yet managing to look super glamorous! Her every day look is quite effortless and youthful, but on the red carpet she definitely likes to dress up. I've chosen a few pieces from across the highstreet that channel the Keeping Up With The Kardashian star's look, as not all of us can afford her high end bits!
l-r; New look jeans & clutch, Romwe sunglasses, Boohoo blazer & dress, iClothing shoes, Missguided crop top
Basic black skinnies are worn by Kendall frequently, and I think they would look great with a white crop top and floral blazer as shown above. You could also mix and match the pieces to dress them up or down! Kendall is quite the fan of cutout dresses, so this Boohoo option is perfect. She also seems quite fond of strappy sandals and jewelled clutches whilst on the red carpet! Better yet, but all these options are under the €25 mark. Score!
Are you a fan of Kendall Jenner's style? If you have a style icon whose look you would like me to recreate, let me know!
Basic black skinnies are worn by Kendall frequently, and I think they would look great with a white crop top and floral blazer as shown above. You could also mix and match the pieces to dress them up or down! Kendall is quite the fan of cutout dresses, so this Boohoo option is perfect. She also seems quite fond of strappy sandals and jewelled clutches whilst on the red carpet! Better yet, but all these options are under the €25 mark. Score!
Are you a fan of Kendall Jenner's style? If you have a style icon whose look you would like me to recreate, let me know!


NYX Butterglosses- The First Lipgloss I've Worn In Years
8.21.2014


OOTD- #DayTripToChic
8.19.2014

images: polyvore
Hey everyone,
If I was to list everything I've done this Summer, it would mainly include:
1) spending 3 weeks at the hospital visiting my sister
2) watching Downton Abbey
3) becoming obsessed with 80s & 90s movies
One of those movies happens to be Clueless- a classic coming-of-age movie from 1995 starring Alicia Silverstone. I've watched it at least 3 times since discovering it this Summer, and I'm obsessed with the character Cher's style! Ok, I'll admit- the yellow tartan is a tad too much, but I adore the matching sets and the shape of her overall look- short skirts, cute jackets and knee high socks. I'm definitely going to be taking inspiration from Cher this Autumn/Winter, as two pieces and the tartan print are two trends that are still going strong!
I've put together some pieces from across the high street that definitely channel Cher's look, whilst remaining totally wearable.

clockwise l-r: New Look skirt, Oasis jacket, Oasis two piece set [shirt & shorts], Boohoo cleated mules, H&M cape, River Island feather fluffy bag, Boohoo slogan t-shirt [images from Polyvore!]
The skirt from New Look has been on my wishlist for ages- I love the blue & yellow colouring! Rather than a yellow two piece like Cher, I chose a yellow blazer instead- perfect for throwing over the tartan two piece that's also from Oasis. Cleated heel shoes are a favourite of mine, and I definitely feel Cher would approve of this option from Boohoo. I discovered this cape on H&M's website and it would certainly modernise this 90's look. Cher is famous for her fluffy pen, so I picked this super cute fluffy bag from River Island instead- it's so unique! Lastly, I could definitely imagine a modern day Cher Horowitz wearing a 'célfie' t-shirt, like this option from Boohoo.
Are you a fan of Clueless? Who is you 'unlikely style icon'?
Unlikely Style Icon: Cher Horowitz from 'Clueless'
8.17.2014
images: polyvore
Hey everyone,
If I was to list everything I've done this Summer, it would mainly include:
1) spending 3 weeks at the hospital visiting my sister
2) watching Downton Abbey
3) becoming obsessed with 80s & 90s movies
One of those movies happens to be Clueless- a classic coming-of-age movie from 1995 starring Alicia Silverstone. I've watched it at least 3 times since discovering it this Summer, and I'm obsessed with the character Cher's style! Ok, I'll admit- the yellow tartan is a tad too much, but I adore the matching sets and the shape of her overall look- short skirts, cute jackets and knee high socks. I'm definitely going to be taking inspiration from Cher this Autumn/Winter, as two pieces and the tartan print are two trends that are still going strong!
I've put together some pieces from across the high street that definitely channel Cher's look, whilst remaining totally wearable.
Hey everyone,
If I was to list everything I've done this Summer, it would mainly include:
1) spending 3 weeks at the hospital visiting my sister
2) watching Downton Abbey
3) becoming obsessed with 80s & 90s movies
One of those movies happens to be Clueless- a classic coming-of-age movie from 1995 starring Alicia Silverstone. I've watched it at least 3 times since discovering it this Summer, and I'm obsessed with the character Cher's style! Ok, I'll admit- the yellow tartan is a tad too much, but I adore the matching sets and the shape of her overall look- short skirts, cute jackets and knee high socks. I'm definitely going to be taking inspiration from Cher this Autumn/Winter, as two pieces and the tartan print are two trends that are still going strong!
I've put together some pieces from across the high street that definitely channel Cher's look, whilst remaining totally wearable.
clockwise l-r: New Look skirt, Oasis jacket, Oasis two piece set [shirt & shorts], Boohoo cleated mules, H&M cape, River Island feather fluffy bag, Boohoo slogan t-shirt [images from Polyvore!]
The skirt from New Look has been on my wishlist for ages- I love the blue & yellow colouring! Rather than a yellow two piece like Cher, I chose a yellow blazer instead- perfect for throwing over the tartan two piece that's also from Oasis. Cleated heel shoes are a favourite of mine, and I definitely feel Cher would approve of this option from Boohoo. I discovered this cape on H&M's website and it would certainly modernise this 90's look. Cher is famous for her fluffy pen, so I picked this super cute fluffy bag from River Island instead- it's so unique! Lastly, I could definitely imagine a modern day Cher Horowitz wearing a 'célfie' t-shirt, like this option from Boohoo.
Are you a fan of Clueless? Who is you 'unlikely style icon'?


3. Taking shade 3 and 4, I lightly brought it under my eye too.
Natural Every Day Eye Makeup
8.14.2014
3. Taking shade 3 and 4, I lightly brought it under my eye too.


Emerald Cosmetics Mineral Eyeshadow Review
8.12.2014
Hey everyone,
Yesterday I attended Sam & Nic from Pixiwoo's meet and greet- it was so much fun! The girls are just as beautiful in person as they are on screen, and super easy to talk to too. It was surreal to meet two of my favourite beauty youtubers, whom I've been watching for ages! My friend Lisa from Grab Life By The Blog [check out her blog, it's only new - please!] took these shots for me. There are some gorgeous locations in Dublin City Centre, and Temple bar is a favourite of mine. It will always be one of my most loved cities, without doubt.
This is the first outfit I've worn this month that has truly made it feel like Autumn is approaching. Autumn and Winter are my favourite seasons, only because of the fashion! There's just something about A/W clothes that set my heart racing with excitement.
I was really inspired by Tara from tarmartales.com & Kildare Village's video for their #DayTripToChic campaign. The campaign video was based in Dublin & Kildare- the two counties I base myself between! It's all about finding a secret escape from the busy Summer life. For my first entry, I chose Temple Bar as it's my favourite area for vintage shopping, rather than the big shopping centres! You can check out their campaign video here:


OOTD- Summer In The City
8.09.2014
Hey everyone,
Yesterday I attended Sam & Nic from Pixiwoo's meet and greet- it was so much fun! The girls are just as beautiful in person as they are on screen, and super easy to talk to too. It was surreal to meet two of my favourite beauty youtubers, whom I've been watching for ages! My friend Lisa from Grab Life By The Blog [check out her blog, it's only new - please!] took these shots for me. There are some gorgeous locations in Dublin City Centre, and Temple bar is a favourite of mine. It will always be one of my most loved cities, without doubt.
This is the first outfit I've worn this month that has truly made it feel like Autumn is approaching. Autumn and Winter are my favourite seasons, only because of the fashion! There's just something about A/W clothes that set my heart racing with excitement.
I was really inspired by Tara from tarmartales.com & Kildare Village's video for their #DayTripToChic campaign. The campaign video was based in Dublin & Kildare- the two counties I base myself between! It's all about finding a secret escape from the busy Summer life. For my first entry, I chose Temple Bar as it's my favourite area for vintage shopping, rather than the big shopping centres! You can check out their campaign video here:


Dream Dots For Spots Review
8.07.2014


OOTD- Don't You Forget About Me
8.03.2014


Ombré Nail Art Tutorial
8.01.2014
Hey everyone,
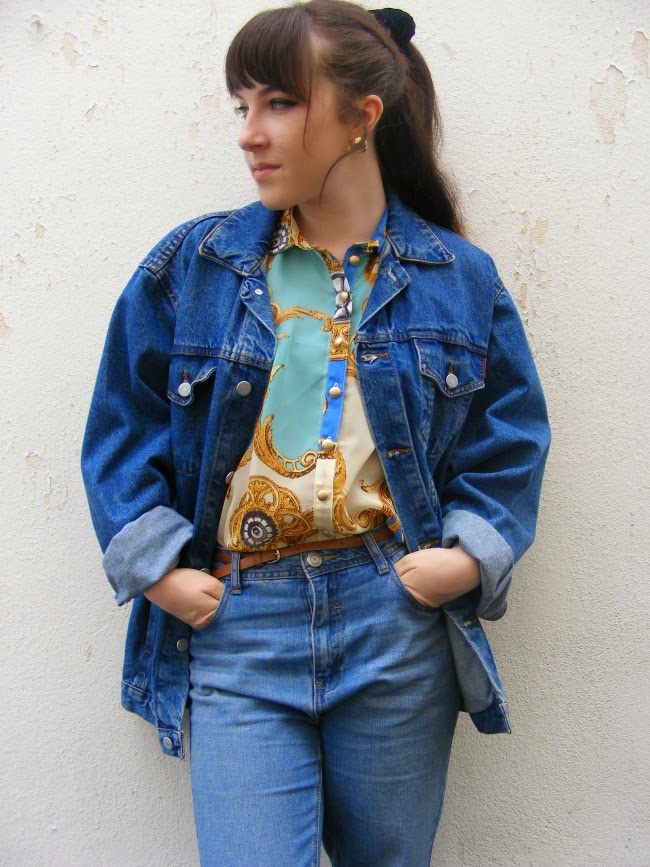
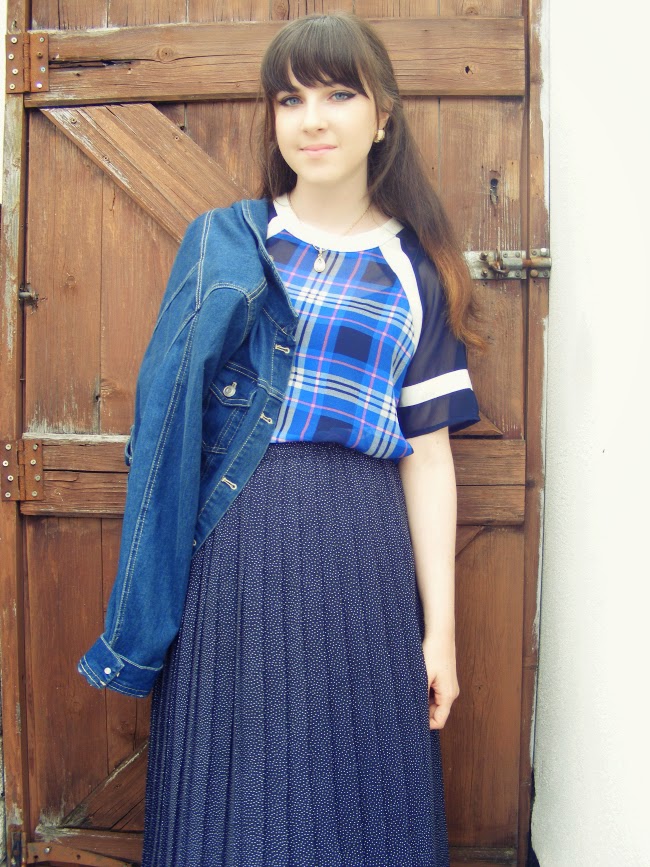
Currently writing this post on a train- there's a first for everything! I wore this outfit to lunch with my godmother a few days ago. As you might have noticed, I've been loving midi skirts lately! They're so 50s esque but I adore how they're making a come back this Autumn. Midi skirts, in my opinion, are a great transition piece from Summer to Autumn, and you can pair them with a lot of different outfits!
School starts back next week, and that mixed feeling of dread and anticipation has returned. I'm going into 6th year, my last year in school, and I can already feel that there will be immense pressure upon me. Not just about exams or schoolwork, but the looming thought of what I'm going to do after school!
I bought this skirt in a charity shop for €2 or €3, and the top was €3 in Penneys- overall a very affordable outfit if I do say so myself!


OOTD- Old Navy
Hey everyone,
Currently writing this post on a train- there's a first for everything! I wore this outfit to lunch with my godmother a few days ago. As you might have noticed, I've been loving midi skirts lately! They're so 50s esque but I adore how they're making a come back this Autumn. Midi skirts, in my opinion, are a great transition piece from Summer to Autumn, and you can pair them with a lot of different outfits!
School starts back next week, and that mixed feeling of dread and anticipation has returned. I'm going into 6th year, my last year in school, and I can already feel that there will be immense pressure upon me. Not just about exams or schoolwork, but the looming thought of what I'm going to do after school!
I bought this skirt in a charity shop for €2 or €3, and the top was €3 in Penneys- overall a very affordable outfit if I do say so myself!
Subscribe to:
Posts (Atom)


